Taking the time to make your WordPress website accessible will ensure that the tools and technologies designed to help people with disabilities access the web can consume the content on your website effortlessly. If your competitors are not staying on top of these efforts, visitors with disabilities will pick your site over theirs. In addition, you may see a boost in your search engine rankings as a website optimized for accessibility can also be a sign of a quality website in the eyes of search engines.
The topic of accessibility on the web can be pretty in-depth, since it covers everything from how you write content as well as design principals and web development standards. If your website audience is largely made up of those with disabilities, you’ll want to put a priority focus on accessibility efforts.
For the purpose of this article, I am going to give you a basic overview of accessibility when it comes to WordPress, including what to look out for and how to find accessibility issues on your website.
What is website accessibility?
In the simplest terms, making your website accessible requires making sure all of the elements and content on every page of your site has the correct HTML markup to identify the purpose of each element on the page. This markup, or labeling system, can help identify between a navigation element and a headline as well as to describe the contents of an image embedded on the page, and much more. In addition, there are also accessibly guidelines to help you write more helpful and informative content as well as guidelines on the use of color and design elements used on a web page.
The concept of accessibility is as old as the web. In fact, web inventor Tim Berners-Lee founded the non-profit organization the “World Wide Web Consortium” in 1994 to ensure the long-term growth of the web by implementing standards and guidelines to help everyone build a web based on the principles of accessibility, internationalization, privacy, and security.
If you want to obtain a deep knowledge of accessibility principles, and why they exist, you can read through the documentation on their website located at w3.org
For this article however, I’m going to simplify these standards to provide actionable steps you can take to make sure your website is accessible.
Before I go into the technical details of accessibility, I want to first cover the specifics of accessibility when it comes to a WordPress website.
The three elements of WordPress accessibility
To make your WordPress website accessible, there are three core elements that you should focus your attention on. The first is the WordPress theme you are using, the second are the plugins you have installed, and the third is the structure of the content you have created in the “Pages” and “Posts” sections of WordPress. Depending on the structure of your site, you may also have other custom content types beyond pages and posts that you’ll need to pay attention to as well.
I’ll go into more technical detail later in this article, but for now I just want you to be aware of these three areas of WordPress accessibility.
WordPress theme accessibility
Your WordPress theme is the core foundation of the design and structure of your website. In an ideal world the original designer and developer of your theme will have implemented best practices when it comes to accessibility. Some theme marketplaces will also make this a requirement of theme developers before selling their WordPress themes.
If you are just purchasing or downloading a new theme, I recommend that you look into any documentation they have available about how they have implemented accessibility into their theme.
If you are unsure about the status of accessibility in the theme you are using, no problem. I’ll go over how you can audit your site and fix any issues that you find further on in this article.
WordPress plugin accessibility
Another aspect of WordPress to be aware of when it comes to accessibility are plugins. But more specifically I am talking about any plugins that might add additional content to your web pages. For example you might have plugins that are adding advertising placements to your web pages, you may also have plugins powering quizzes, or email newsletter sign-up forms.
Any time you have a plugin adding additional content to your web pages, you’ll want to make sure that these plugins have developed accessibility into their implementations.
WordPress content accessibility
Finally, the last place on WordPress where accessibility will affect you is the content of your blog posts, pages and any other content that you use WordPress to publish. Thankfully WordPress does provide some helpful guidance via their Gutenberg editor while you are writing content to make sure you are structuring things correctly, but it is possible that human error can introduce issues that will affect accessibility tools from consuming the content.
The most common accessibility issues on a website
While the topic of web accessibly can be pretty vast and involve a lot of nitty gritty details, there are some obvious issues that commonly occur on all websites. Below is an overview of the most common accessibility issues you might encounter.
The web page does not use the recommended HTML structure
Every web page should use the recommend HTML structure for structuring the design and content. This structure should be logical to how you would read the page from top down, with the correct use of HTML markup and headings. To fix any issues with your HTML structure, you’ll need the help of a web developer.
The user can not tab through the page correctly
One of the most important accessibility aspects for any website is to make sure that the user can navigate your web pages without a mouse, solely using a keyboard. These users include those with motor impairments, such as a repetitive stress injury (RSI) or paralysis, as well as screen reader users.
If you visit a webpage that has implemented accessibility best practices, you’ll be able to hit the tab key on your keyboard to highlight each element on the page. As you continue hitting the tab key, you should be able to logically flow down the page to every element so that you can either click on a link by hitting the enter key, or read the content. This tab order is how a lot of accessibility tools can flow through a web page to consume it’s content correctly. Try hitting the tab key a few times on one of your web pages to see the status of your “tab order”. If you need to fix this issue, you’ll need to hire a web developer, as you’ll likely need to fix the underlying HTML structure of your WordPress theme.
Image embeds are missing alt text
There are two types of images on every web page. A decorative image and a functional image. Decorative images are design or graphical elements that do not specifically relate to the content on the page. Functional images are images that are mostly contained within the content of the page and relate to what the article or page is talking about. All of these images should have an alt tag included within the HTML markup that embeds the image on the page. Here is an example:
<img src="some-image.jpg" alt="Put the description of your image here. How would you describe what is happening in the image if someone couldn't see it?" />
As you can see from this example, you should use alt tags on functional images to describe what is happening in the image. Your description should make sense to anyone who can’t see the image.
For decorative images, you should still include the alt tag, but you can leave it’s contents blank.
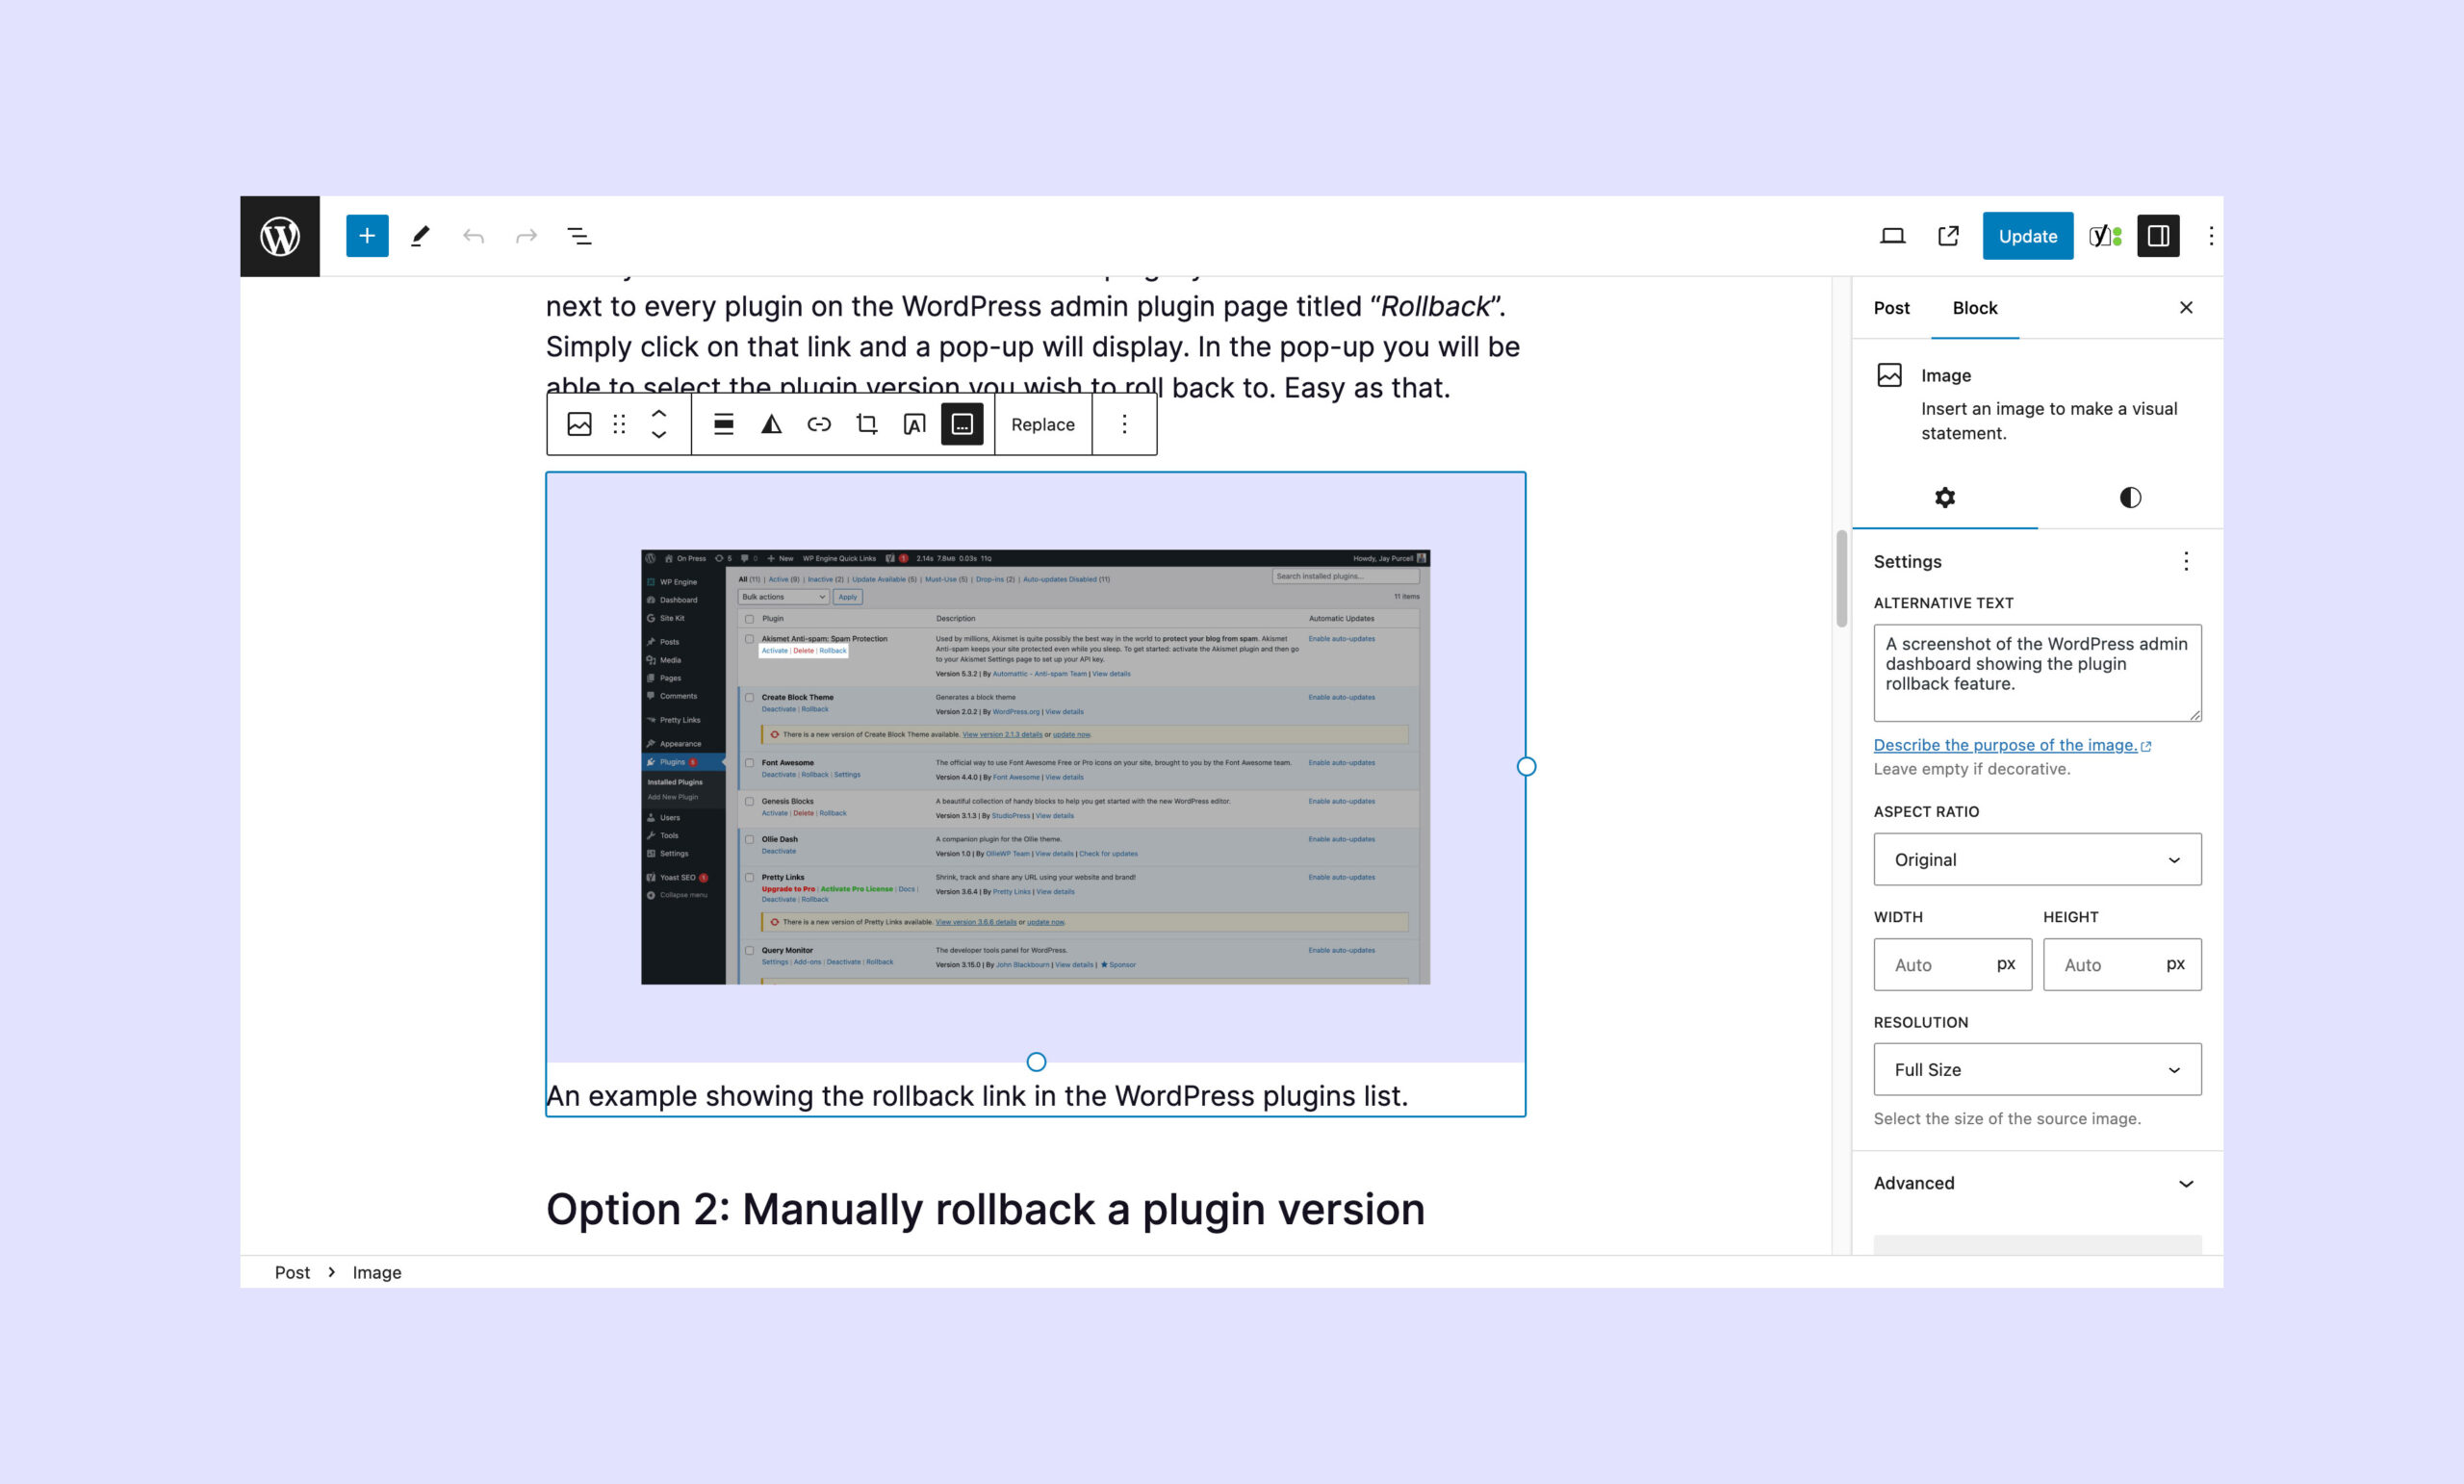
To add alt text to an image in WordPress, simply click on the image in the editor. In the right-hand panel, look for the “ALTERNATIVE TEXT” section, and input your description here. If you don’t see this menu, make sure to click on the window icon in the top right of the screen to show the menu.
How to audit your WordPress website for accessibility issues
Now that you have a full understanding of what accessibility is and how it can affect your WordPress website, we can now go into some more technical detail about how to find and fix these issues.
As a reminder, this article is not meant as a deep dive into the world of accessibility on the web. I am focused more on specific issues which we can find and fix within WordPress.
Using Google Chrome to audit your website for accessibility
One of the quickest, simplest and free ways of auditing your website for accessibility is to use Google’s Chrome web browser. They have a browser extension called “Lighthouse” which is able to run various tests on your website. This tool will not only provide the accessibility status of your webpage, but it will also provide you with an overall score and a list of actionable items you can address to improve accessibility on your site.
How to use Lighthouse in Google Chrome:
- Download the Chrome browser
- Install the Lighthouse extension
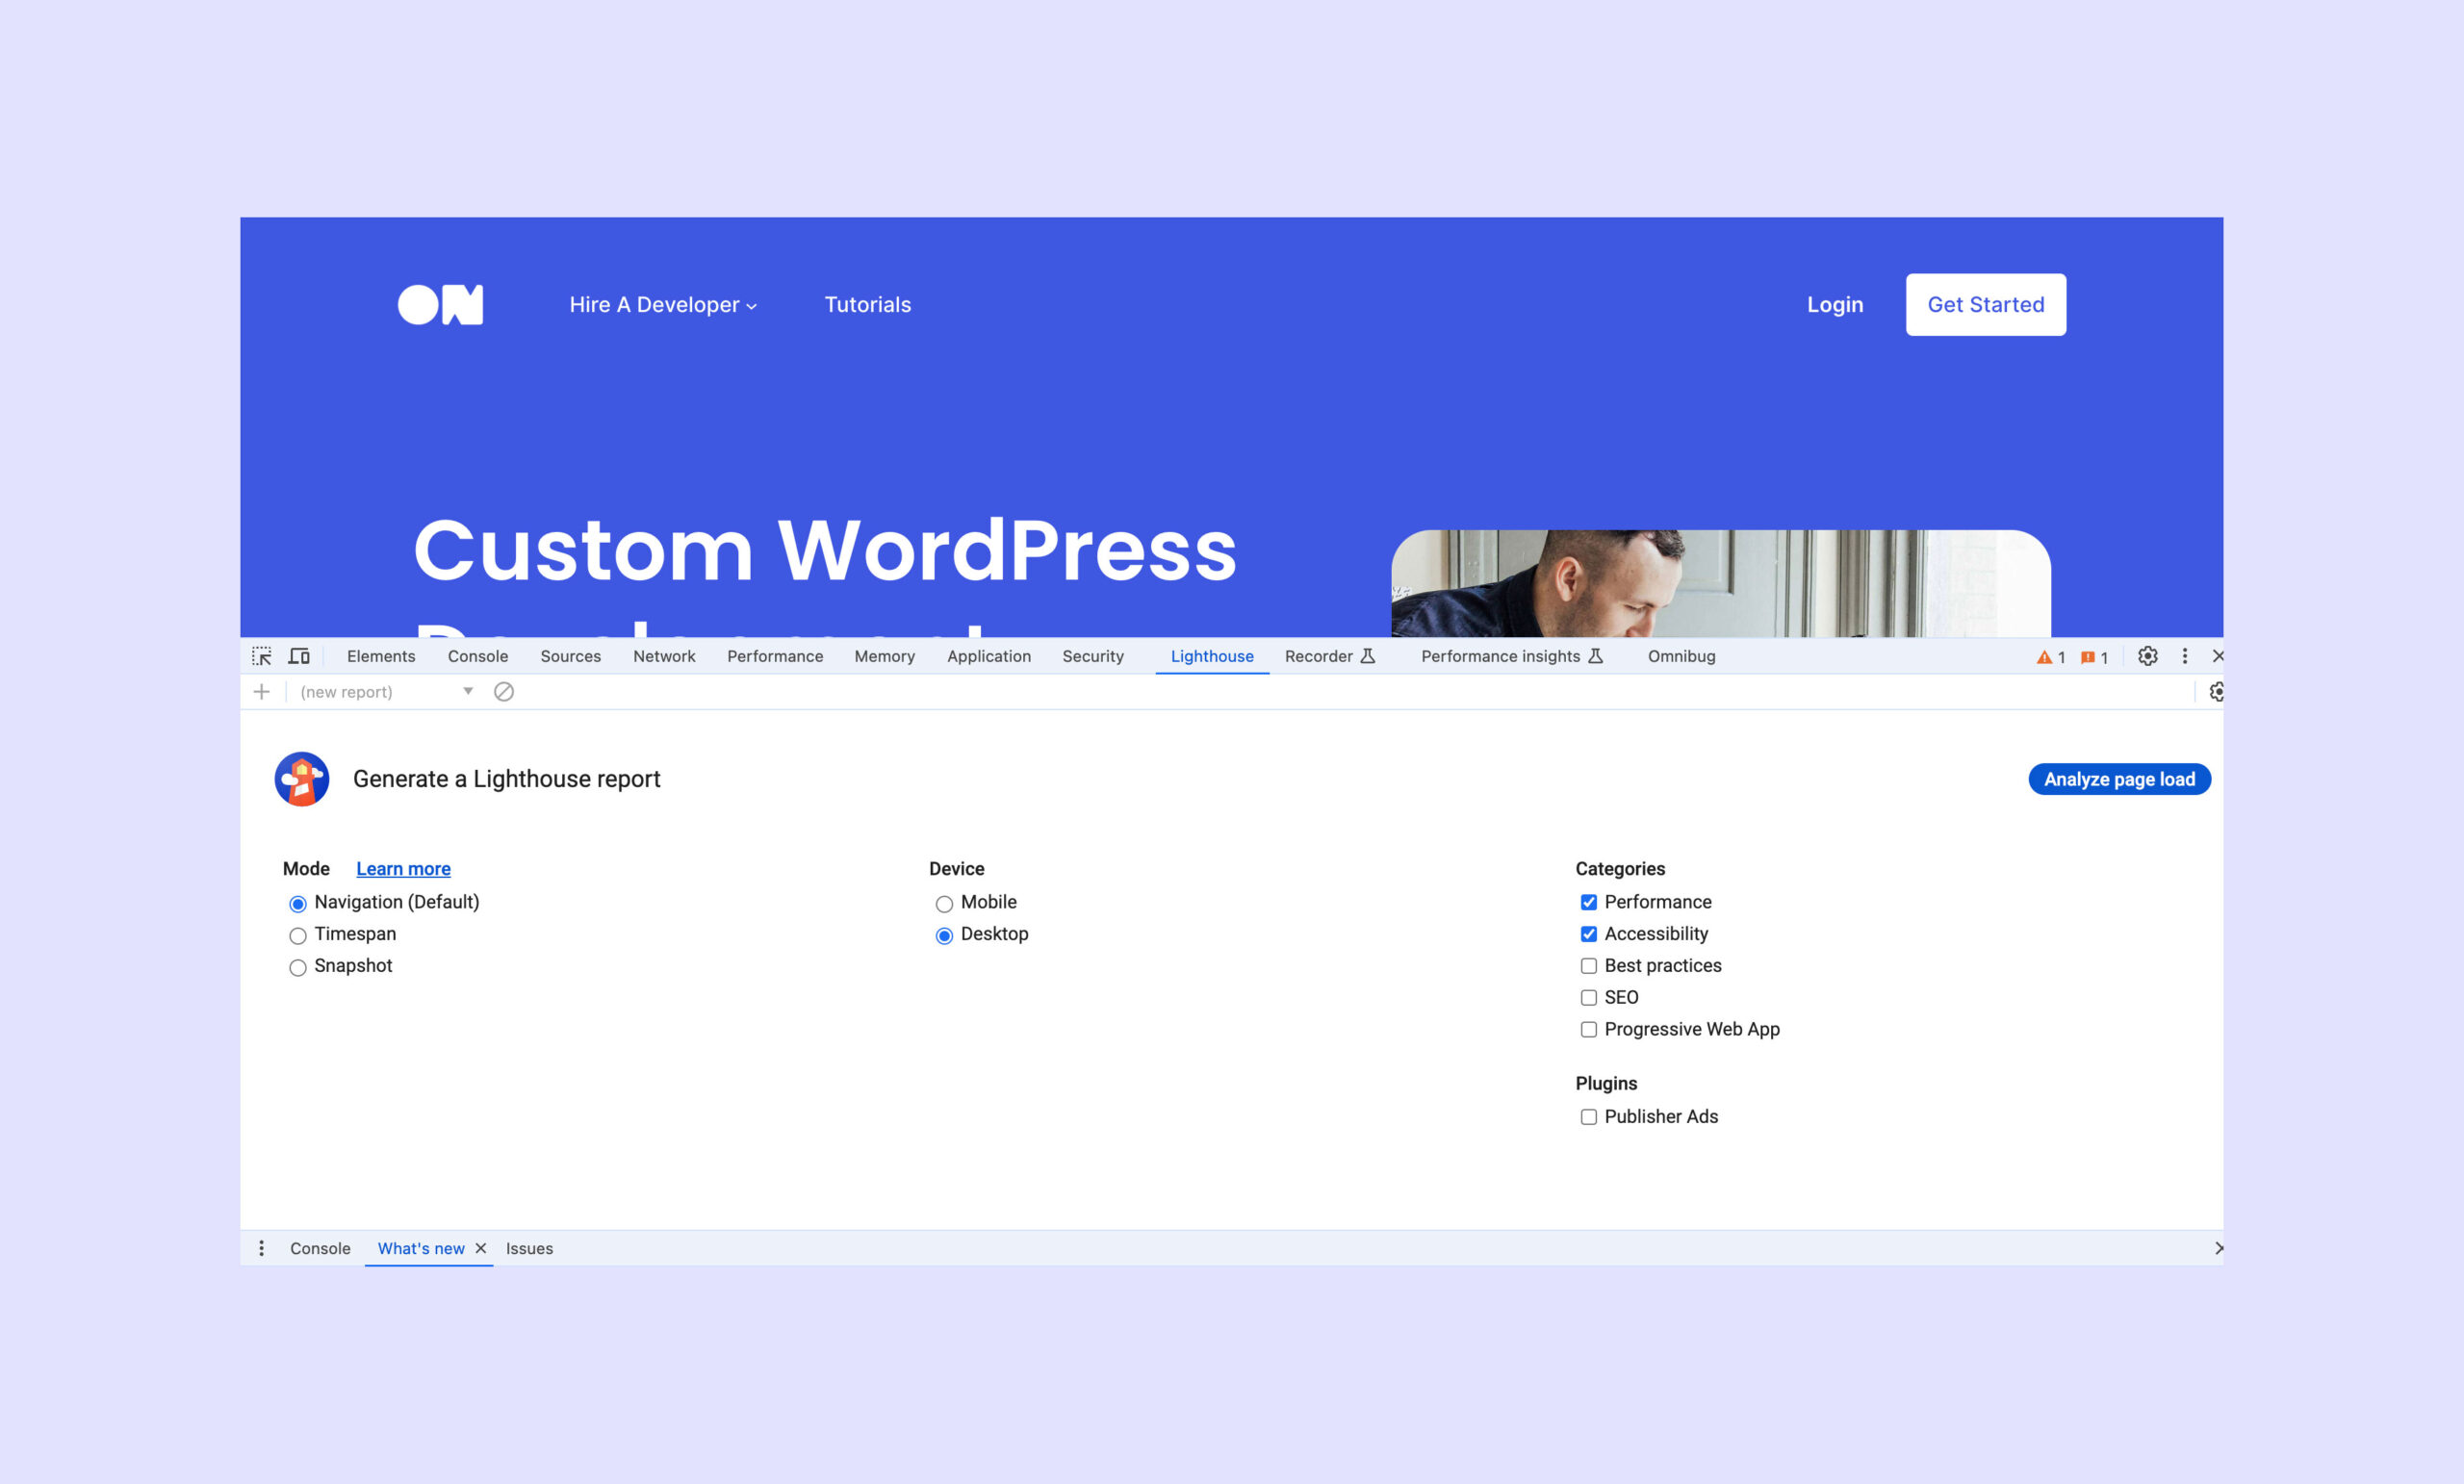
- Visit your webpage and right click anywhere on the page to bring up the settings menu. In this menu select “Inspect”.
- The “Inspect” window should now open. In this window click on the menu item labelled “Lighthouse”.
- In the Lighthouse settings panel, you can select the options to run a test on. For our purposes we’ll want to select “Navigation” from the “Mode” menu, “Desktop” from the “Device” menu and in the “Categories” menu we’ll want to deselect everything except “Accessibility”. With those settings selected you can then click the “Analyze page load” button.
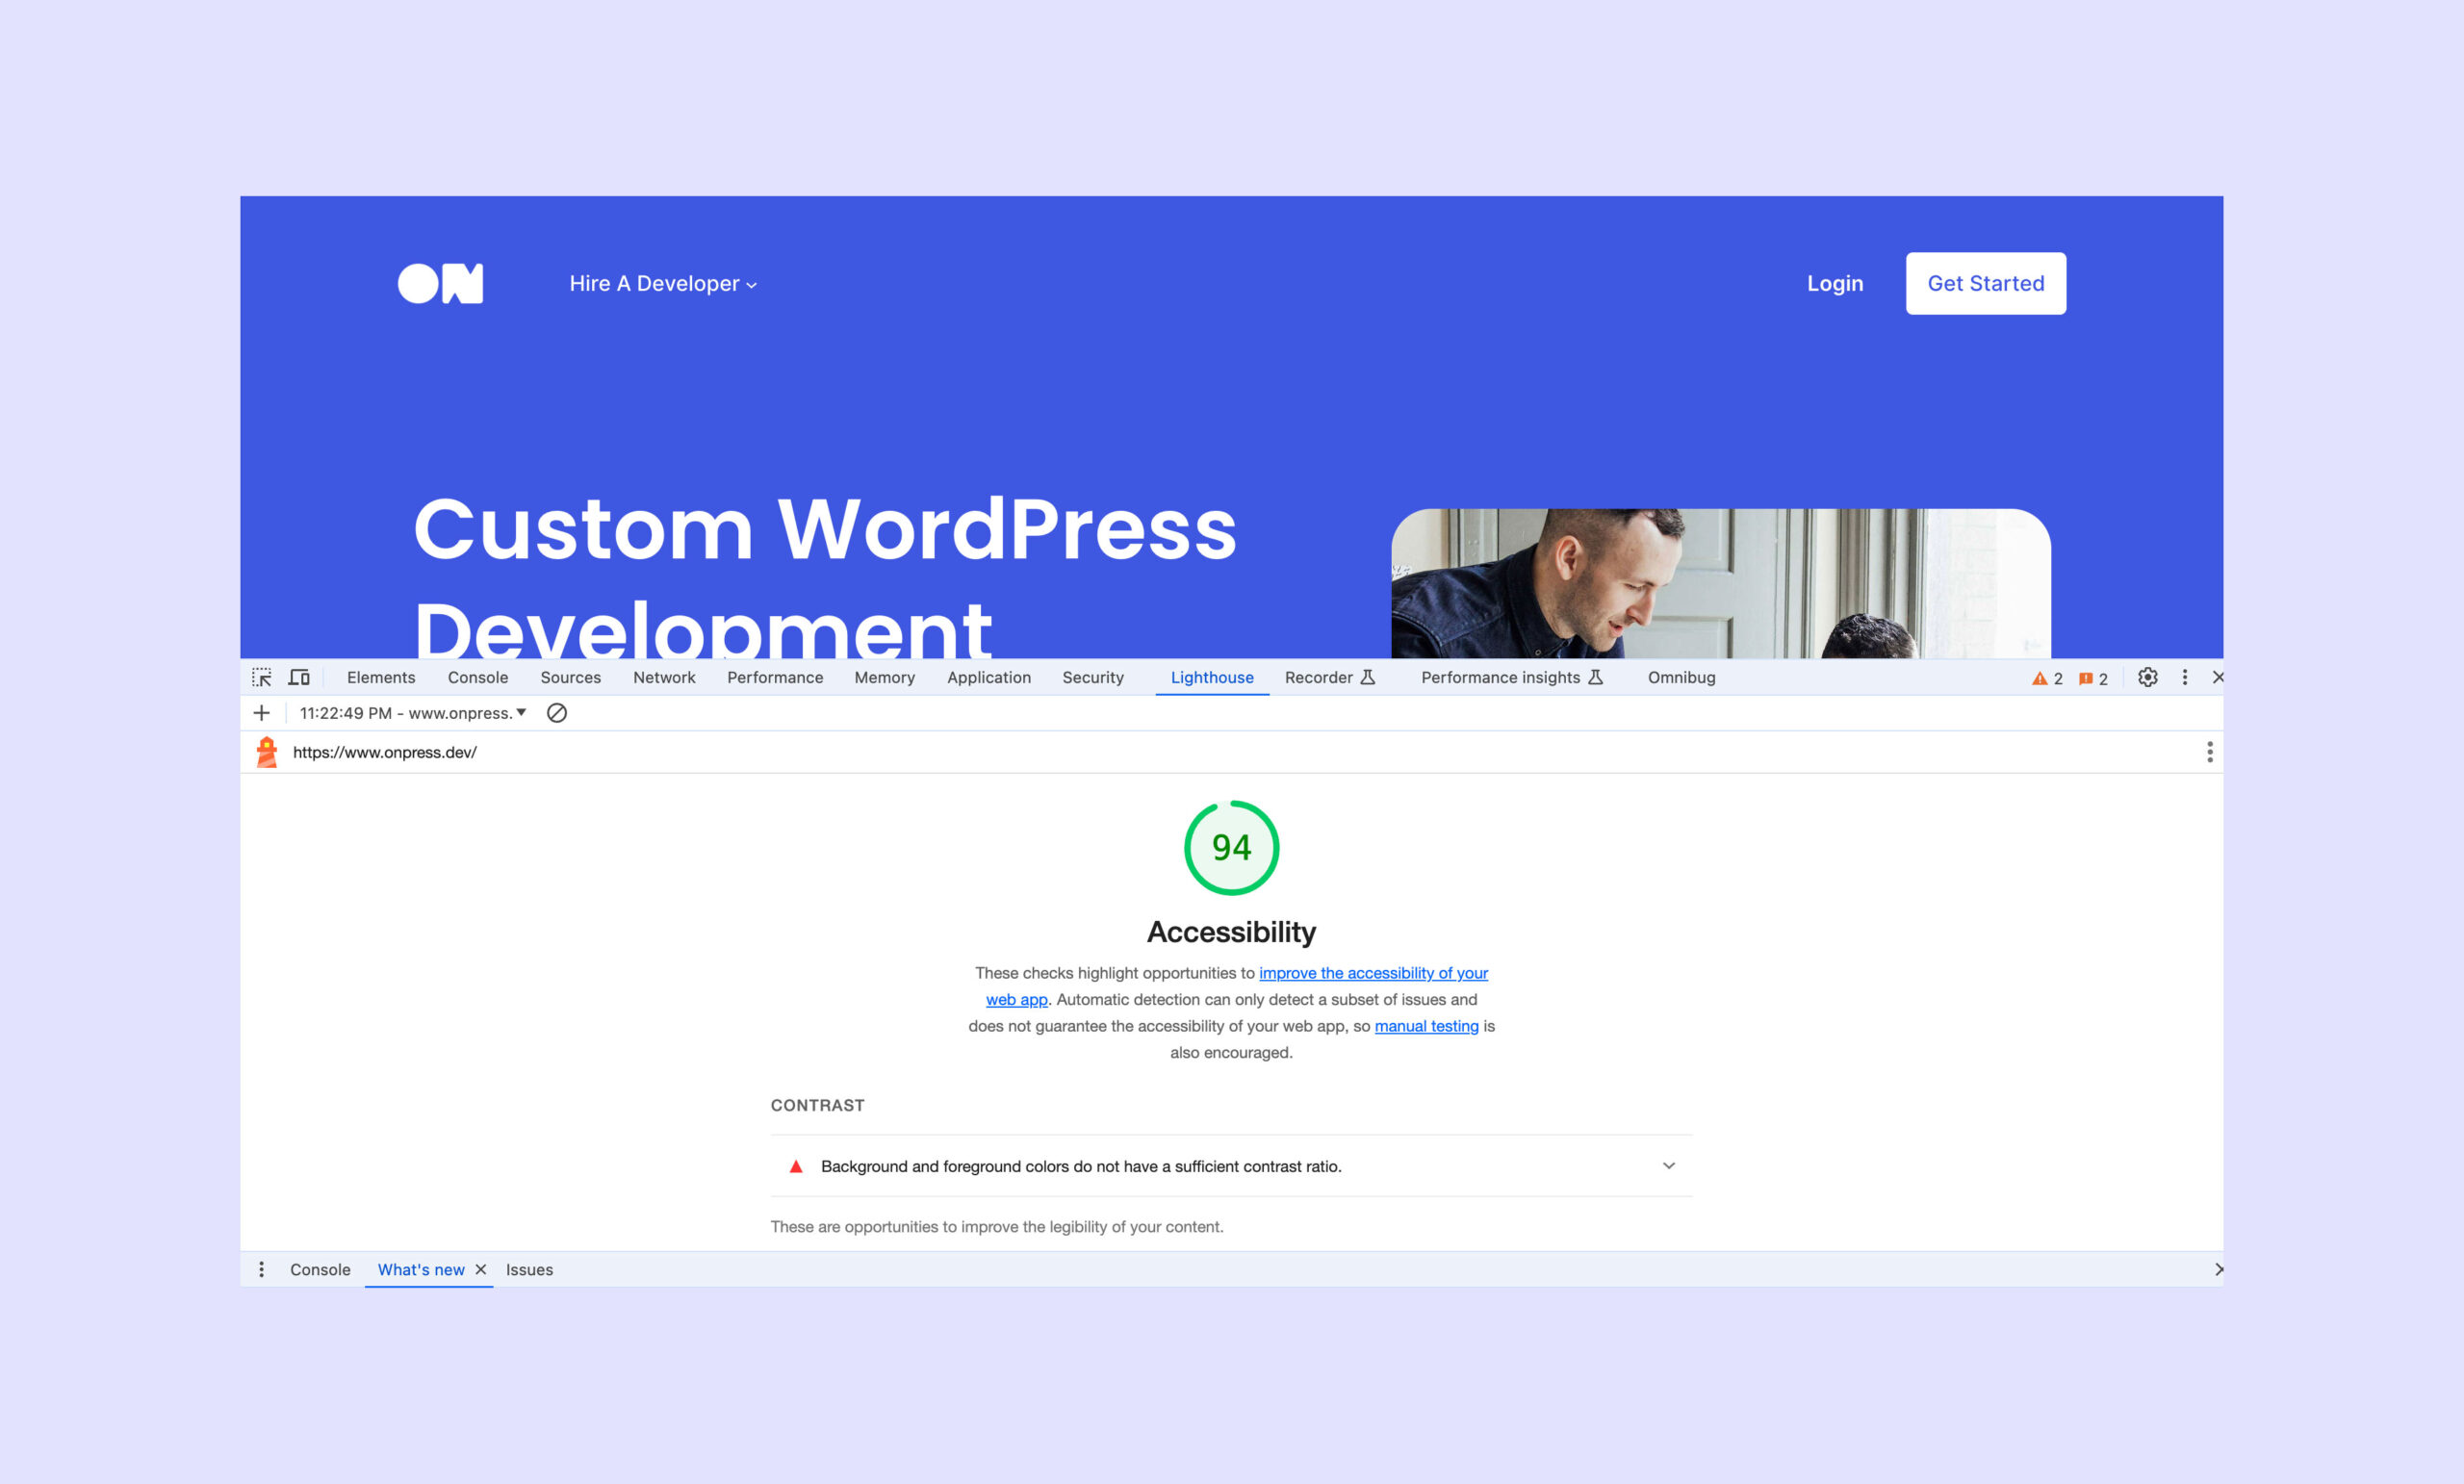
- Chrome will now take a moment to analyze and reload the page. Once it has completed, the Lighthouse settings menu will reload with the results of the analysis. You can then use this useful information to address any issues you encounter.
If you are unsure of what these issues are, or how to fix them, it’s best to consult the services of a web developer who can not only fix these issues, but also run their own tests to catch anything that Lighthouse might have missed.
Other tools
You may be surprised to hear that there are actually hundreds of accessibility tools and resources out there to help with auditing websites. They can vary in complexity, including some very robust solutions for web developers. A good place to start checking out these tools is on the W3C site.
Further reading
If you are interested in doing a deeper-dive into accessibility issues, I recommend starting with the following resources:
Leave a Reply